

Well, it took a while but I finally installed the kit to connect my dashcam to the fuse box so there are no more dangling wires and no need to plug into the cigarette lighter.
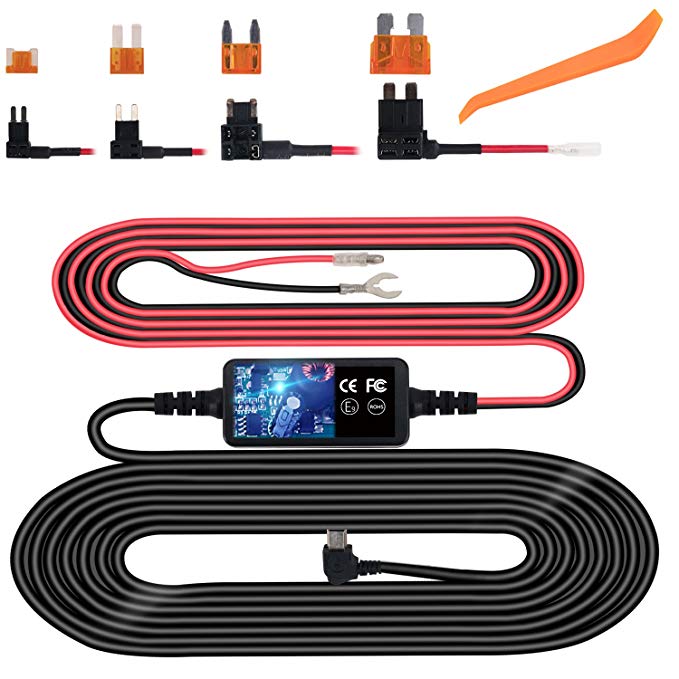
I ordered this fuse tap kit which includes:
- Long cable with a mini-usb connector on one end and a connection to the fuse tap on the other end with the 12v to 5v converter in between
- 4 types of fuse taps and fuses
- Plastic pry bar to pop the dash panels and to hide the cable in between panels
![Image]()
![Image]()
It took areound 2 hours to install, but most of the time went into trying to figure out the best way to route the cable and finding a bolt on the car to attach the ground cable to. If I were to do another Niro, I could probably do it in less than half an hour. After a lot of trial and error, I figure the best way to start is to start at the fuse panel and then route the cable up to the dashcam.
*** Proceed at your own risk! I am not a professional and I am only relating my own experiences. ***
First, position your dashcam on the windshield. If you are going to use the 3M adhesive to permanently attach it to the windshield, use some duct tape or painter’s tape to position it temporarily while to do the cabling. If you’re using the suction cup or other adjustable mounting system then you can attach the dashcam to the windshield. It’s probably best to power up the dashcam using the cigarette lighter power plug to ensure that you’re happy with its placement.
Carefully pull the weatherstripping around the door from the A-pillar down to the floor. Then pop open the fuse panel door located on panel underneath the steering wheel on the lower left side. Insert the mini-usb end of the cable into the fuse box and route it to left side of the panel. Pop the left side of the lower panel where the hood release latch is located. I couldn’t totally remove this panel because i probably needed to take off the latch, but just popping the left side gave me enough room to route the cable out of the fuse area and into the channel where the weatherstripping normally sits.
![Image]()
![Image]()
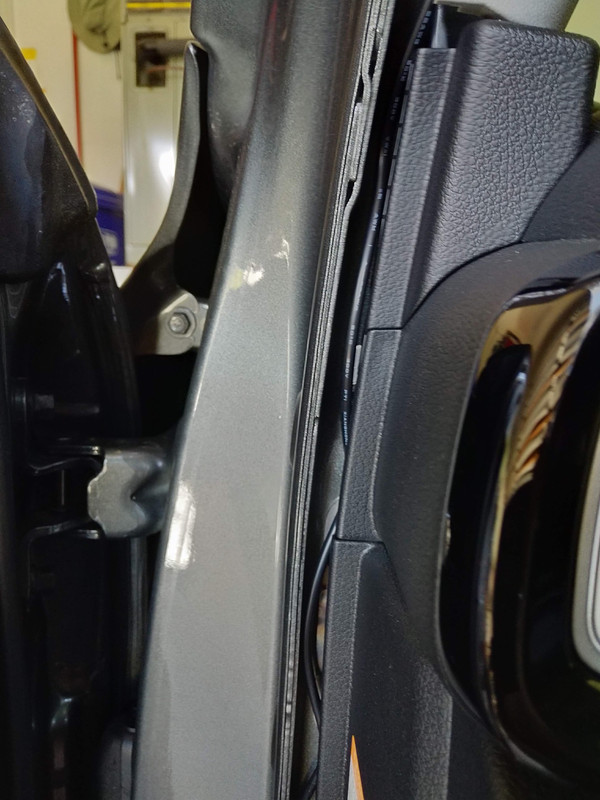
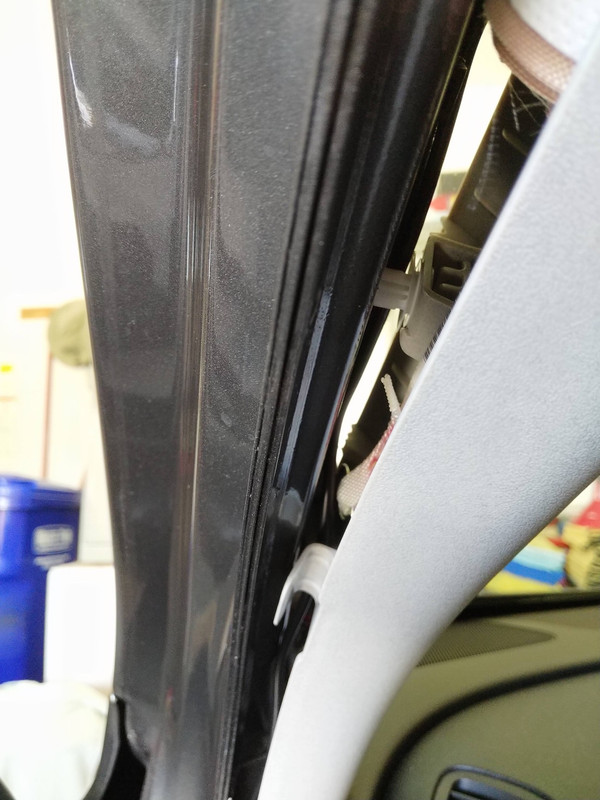
Next, pop out the A-pillar cover. Grip it at the top and pull gently straight out. It won’t come off entirely. I think there’s a clip for the side airbag that keeps it attached and I didn’t want to force. But there is enough space between the metal and the cover to keep routing the cable up towards the roof. I duct taped the usb connector to a short length of string trimmer line to route the cable from the door side to the front windshield side. I made sure to do this well below the rolled up airbag. Once the cable is on the windshield side, pull enough cable to go up the A-pillar and along the headliner and to the dashcam. Again, make sure the cable is not interfering with the airbag. There is enough room at the front of the A-pillar for the cable. Once the cable is at the corner of the A-pillar and the headliner, tuck the cable into the headliner and work your way towards the dashcam. You can use the plastic pry bar to tuck the cable between the windshield and the front edge of the headliner.
![Image]()
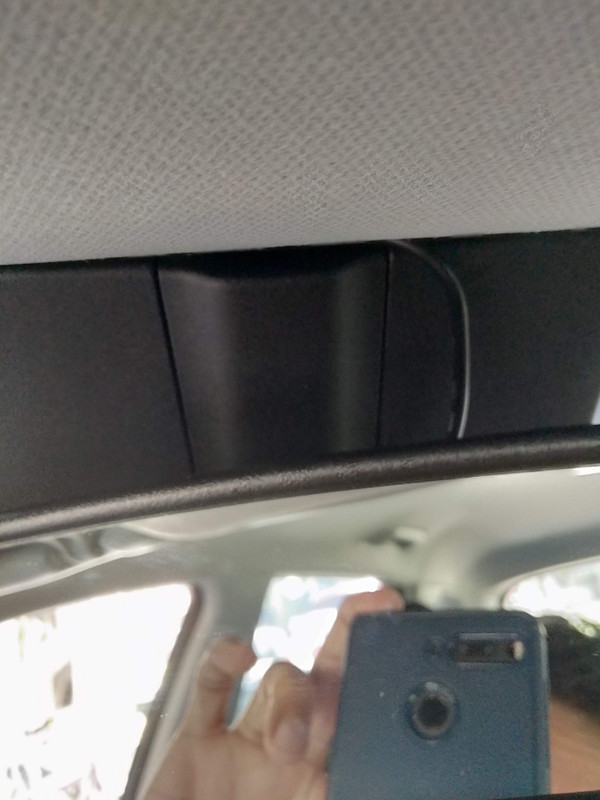
The white object at the top of this picture is the airbag rolled up like roll of wrapping paper.
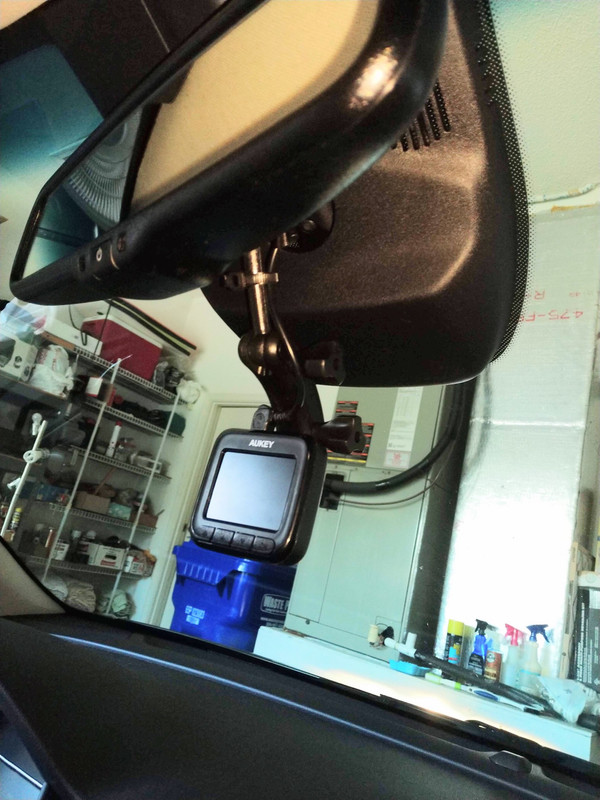
Once you get to the sensor cover, the space gets tighter. When the cable is directly above the dashcam, route the cable downwards towards the cam. Ensure that the mini-usb connector will reach the cam and plug it in. The mount that I used attaches to the arm of the rear view mirror, so I routed the cable down the middle of the sensor cover and then ziptied the cable to the mirror arm.
![Image]()
![Image]()
Pop the A-pillar cover back into place. Again, make sure that the cable is not interfering with the airbag and that the airbag and the cable are not being crimped when you pop the cover back on.
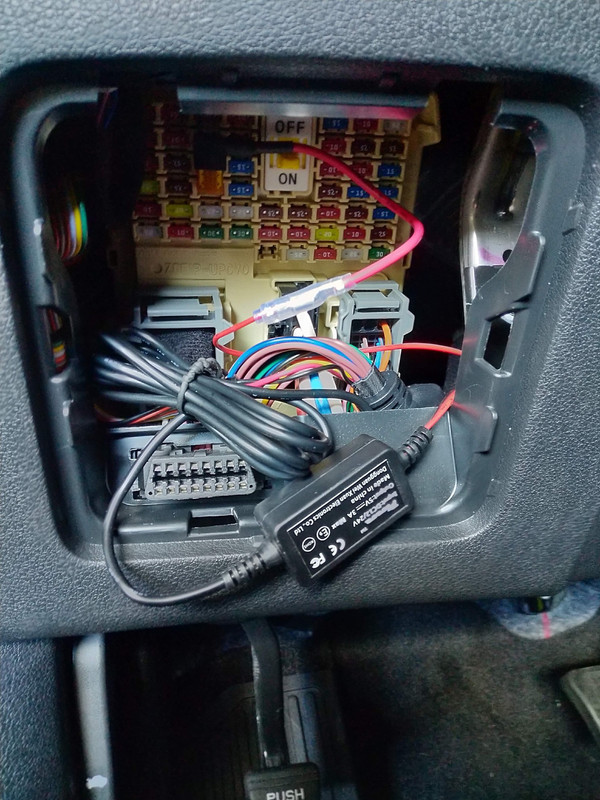
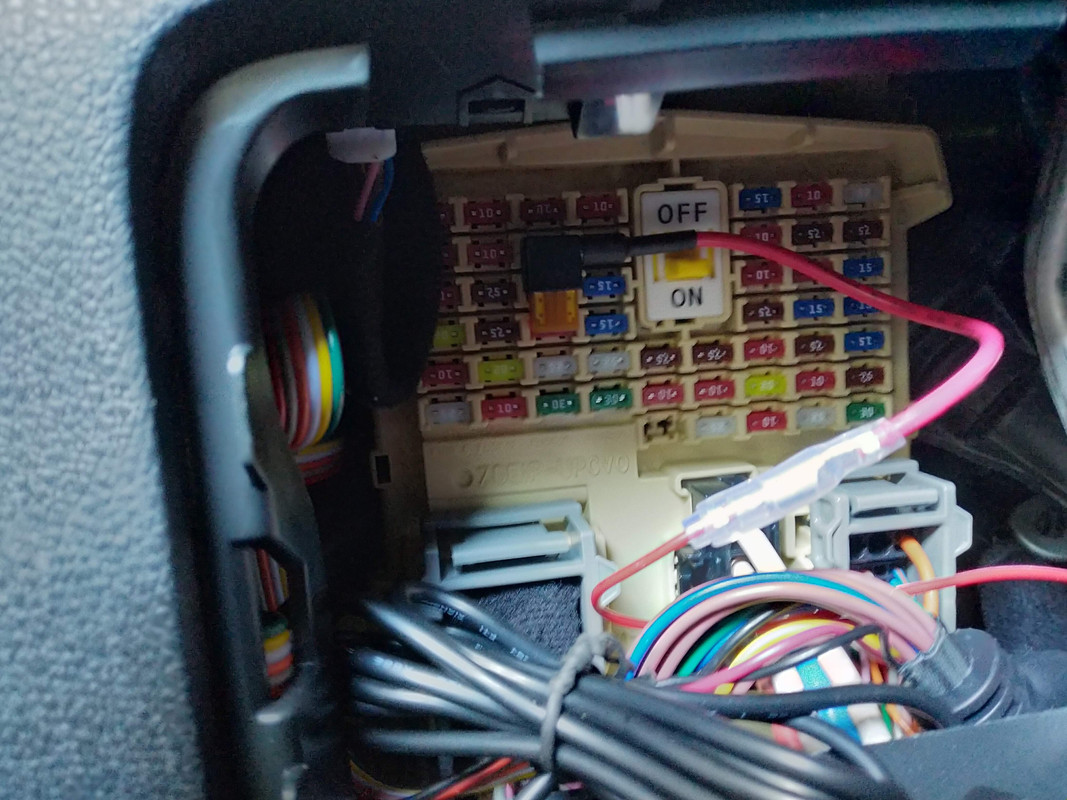
Back at the fuse box, locate the spare 10A fuse in position 3 across and 2 down and unplug it. Take note of its orientation. Find the fuse tap from the kit that matches the fuse’s size. The fuse tap has two places for fuses. Orient the fuse tap so the wire is on the right side and the pins pout down. Plug the fuse into the the bottom position. Plug in the compatible fuse from the kit. I think it is a 5A fuse and it will short out if there is a problem so that the actual fuse and your electronics will not be damaged. Find the other connector from your cable and plug the fuse tap into that. I wasn’t sure if I had to crimp them together but the connection felt pretty tight so I didn’t bother. Plug the fuse tap back into the empty slot. The cable should point towards the right.
![Image]()
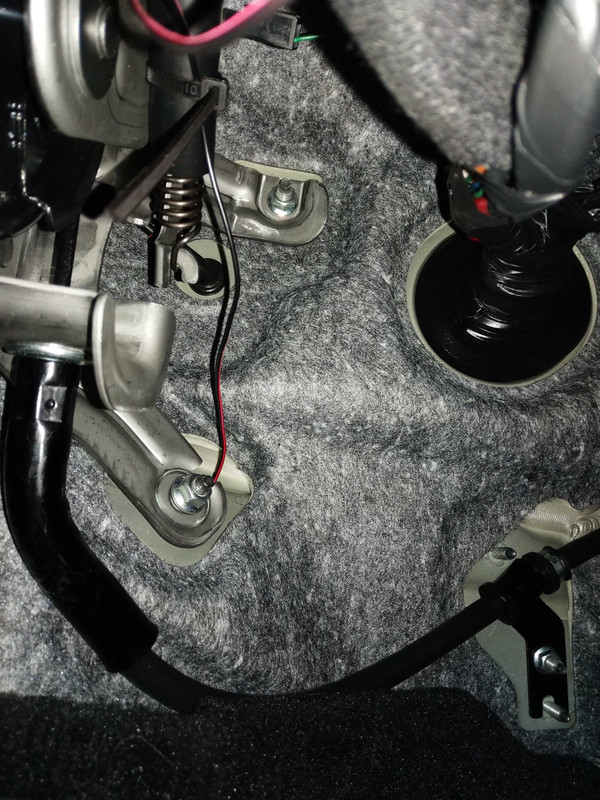
The final step is to ground the cable. There is a black ground wire that must be attached to the metal of the car. There is a bolt in the fuse box that is in the perfect position but I did not have a compatible wrench or socket to loosen it since it was in a tight spot. I could not figure out how to remove the panel and the knee airbag is there as well. I ended up routing the black wire below the fuse box, past the foot brake and attaching it to a bolt on the floor. I loosened the nut so that I had enough room to put the ground connector underneath and then tightened the nut. I then ziptied the wire to the nearest spot so it wouldn’t hang loose.
![Image]()
Once everything is connected, turn on the car to check that the dashcam works. If not, check your connections and that the fuses and the tap are installed in the correct way. I’m not sure what would happen if they weren’t. I suspect one of the fuses would short out. If everything works, you can now mount and position the dashcam in its final spot, tuck the extra cable and the converter into the fuse box and replace the cover. I only drove my car briefly, so I can’t tell if there are any rattles.
I hope someone finds this info useful. Since the Niro is a relatively new car, there are no specific tutorials on how to do this. It’s a relatively simple procedure but it helps to have an idea what things look like before starting.
If anyone knows how to remove the lower panel so I can get to the bolt inside of the fuse box, I’d rather connect the ground wire to that one.
Again, do this at your own risk!
I ordered this fuse tap kit which includes:
- Long cable with a mini-usb connector on one end and a connection to the fuse tap on the other end with the 12v to 5v converter in between
- 4 types of fuse taps and fuses
- Plastic pry bar to pop the dash panels and to hide the cable in between panels
It took areound 2 hours to install, but most of the time went into trying to figure out the best way to route the cable and finding a bolt on the car to attach the ground cable to. If I were to do another Niro, I could probably do it in less than half an hour. After a lot of trial and error, I figure the best way to start is to start at the fuse panel and then route the cable up to the dashcam.
*** Proceed at your own risk! I am not a professional and I am only relating my own experiences. ***
First, position your dashcam on the windshield. If you are going to use the 3M adhesive to permanently attach it to the windshield, use some duct tape or painter’s tape to position it temporarily while to do the cabling. If you’re using the suction cup or other adjustable mounting system then you can attach the dashcam to the windshield. It’s probably best to power up the dashcam using the cigarette lighter power plug to ensure that you’re happy with its placement.
Carefully pull the weatherstripping around the door from the A-pillar down to the floor. Then pop open the fuse panel door located on panel underneath the steering wheel on the lower left side. Insert the mini-usb end of the cable into the fuse box and route it to left side of the panel. Pop the left side of the lower panel where the hood release latch is located. I couldn’t totally remove this panel because i probably needed to take off the latch, but just popping the left side gave me enough room to route the cable out of the fuse area and into the channel where the weatherstripping normally sits.
Next, pop out the A-pillar cover. Grip it at the top and pull gently straight out. It won’t come off entirely. I think there’s a clip for the side airbag that keeps it attached and I didn’t want to force. But there is enough space between the metal and the cover to keep routing the cable up towards the roof. I duct taped the usb connector to a short length of string trimmer line to route the cable from the door side to the front windshield side. I made sure to do this well below the rolled up airbag. Once the cable is on the windshield side, pull enough cable to go up the A-pillar and along the headliner and to the dashcam. Again, make sure the cable is not interfering with the airbag. There is enough room at the front of the A-pillar for the cable. Once the cable is at the corner of the A-pillar and the headliner, tuck the cable into the headliner and work your way towards the dashcam. You can use the plastic pry bar to tuck the cable between the windshield and the front edge of the headliner.
The white object at the top of this picture is the airbag rolled up like roll of wrapping paper.
Once you get to the sensor cover, the space gets tighter. When the cable is directly above the dashcam, route the cable downwards towards the cam. Ensure that the mini-usb connector will reach the cam and plug it in. The mount that I used attaches to the arm of the rear view mirror, so I routed the cable down the middle of the sensor cover and then ziptied the cable to the mirror arm.
Pop the A-pillar cover back into place. Again, make sure that the cable is not interfering with the airbag and that the airbag and the cable are not being crimped when you pop the cover back on.
Back at the fuse box, locate the spare 10A fuse in position 3 across and 2 down and unplug it. Take note of its orientation. Find the fuse tap from the kit that matches the fuse’s size. The fuse tap has two places for fuses. Orient the fuse tap so the wire is on the right side and the pins pout down. Plug the fuse into the the bottom position. Plug in the compatible fuse from the kit. I think it is a 5A fuse and it will short out if there is a problem so that the actual fuse and your electronics will not be damaged. Find the other connector from your cable and plug the fuse tap into that. I wasn’t sure if I had to crimp them together but the connection felt pretty tight so I didn’t bother. Plug the fuse tap back into the empty slot. The cable should point towards the right.
The final step is to ground the cable. There is a black ground wire that must be attached to the metal of the car. There is a bolt in the fuse box that is in the perfect position but I did not have a compatible wrench or socket to loosen it since it was in a tight spot. I could not figure out how to remove the panel and the knee airbag is there as well. I ended up routing the black wire below the fuse box, past the foot brake and attaching it to a bolt on the floor. I loosened the nut so that I had enough room to put the ground connector underneath and then tightened the nut. I then ziptied the wire to the nearest spot so it wouldn’t hang loose.
Once everything is connected, turn on the car to check that the dashcam works. If not, check your connections and that the fuses and the tap are installed in the correct way. I’m not sure what would happen if they weren’t. I suspect one of the fuses would short out. If everything works, you can now mount and position the dashcam in its final spot, tuck the extra cable and the converter into the fuse box and replace the cover. I only drove my car briefly, so I can’t tell if there are any rattles.
I hope someone finds this info useful. Since the Niro is a relatively new car, there are no specific tutorials on how to do this. It’s a relatively simple procedure but it helps to have an idea what things look like before starting.
If anyone knows how to remove the lower panel so I can get to the bolt inside of the fuse box, I’d rather connect the ground wire to that one.
Again, do this at your own risk!
")


